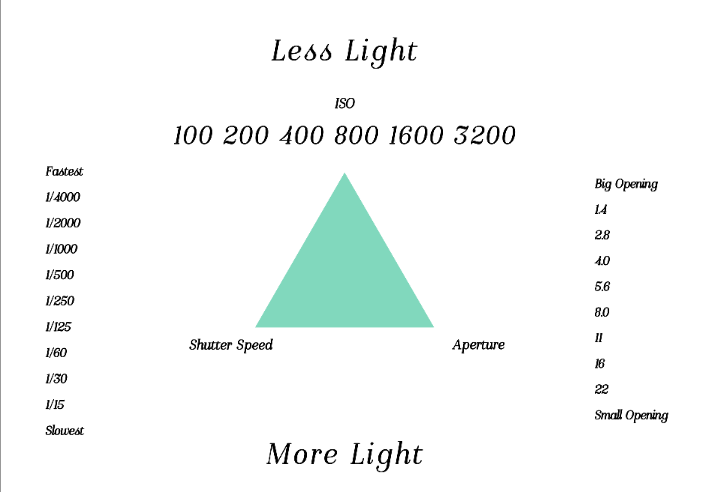
Digital Single Lens Reflex (DSLR) Photography Exposure Triangle 101
I have always had interested in photography since I took it as an elective in college years ago. Recently I have been searching for a wedding photographer which has sparked the interest again. I recently found a great deal for a Nikon 3300, so I have been busy watching numerous youtube videos, online webinars, and reading books. I am hoping that putting this into words that make sense to me will help others make sense of the photography exposure triangle. When you hear photographers talking about getting the right exposure that just means that they are trying to get the picture color and clarity right.

ISO
The image sensor is what controls the how sensitive your camera is to light, so this setting controls how light or dark the picture is. The lower the ISO number, the less sensitive it is to the light, so you want to use it in already bright lighting conditions where you do not need the camera to lighten it. The ISO should be set at the lowest setting possible in that lighting condition to get the clearest picture. The higher the number the more grain or “noise” in the pictures. Increase the ISO low-light environments to capture images without having to use a flash. This is the first thing you want to set.
Lower ISO = less grain
Darker the Environment -> Raise ISO
100- Bright sunlight / Perfect lighting conditions
200- Cloudy but bright
400- Overcast/shade on a bright day
800-
1600- Indoors in a well-lit room
3200 + too noisy
Aperture (f-number)
Aperture sets how open or closed the lens is. Controls depth of field or how much of the picture is in focus. The lower the f-stop the larger the opening and more light reaching the sensor. This reduces the clarity of the background but allows you to lower the ISO and use a faster shutter speed. The higher the f-stop the higher the clarity in the background. For a landscape picture, you would want a big depth of field to get everything clear. Portraits you would want a small depth of field so the person is in focus, but there isn’t distraction that takes away from them in the back.
Lower the f-stop -> larger the opening
Lower f-stop -> blurrier background
Big opening/smaller depth of field
1.8- macro shots (bug/flower)
2-
2.8- headshot
4.0-
5.6+ Groups — webinar 2.2
8.0- Street Photography
11+ Landscape photography
16-
Small opening/Greater depth of field
Shutter Speed
Shutter speed is the length of time your shutter remains open. It is measured in fractions of a second. Gives control of how much motion you see in the picture. This helps stops objects in motion. The faster the shutter speed the more it freezes the object because nothing has been able to move in that brief period of time. It also controls how much light is captured on the sensor. The faster the shutter speed the less time light has to reach the sensor. Never shoot with a shutter speed lower than your lens focal length to prevent camera shake. Ie. never shoot slower than 1/50 with a 50mm lens.
Fastest
1/2000
1/1000- racing car
1/500- running
1/250 – walking
1/125- portraits (100-400 kids), stationary objects
1/60
1/30+ needs to be on tripod and use a remote
4 sec- street car lights
30 sec – dusk or night sky
Slowest
If you have any tips or tricks or anything to add that make this easier to understand, please comment below. 🙂